
Rhinoplasty continues to be one of the most popular facial plastic surgery procedures. Whether you’re looking to enhance your facial harmony, breathe better, or both, this guide will walk you through everything you need to know about the procedure and the entire rhinoplasty process here at Ridenour Plastic Surgery. From your first consultation at our St. Louis office to your final results, we’ll explore what you can expect on your rhinoplasty journey.
What Is a Rhinoplasty?
A rhinoplasty, commonly known as a “nose job,” is a surgical procedure that can reshape the external appearance of the nose while improving its internal structure.
This sophisticated surgery can address various concerns, including:
- Reducing a prominent nasal bump
- Refining the nasal tip
- Straightening a crooked nose
- Raising a droopy nasal tip
- Improving breathing difficulties
- Creating better facial balance
Today’s surgical techniques allow for precise modifications that can dramatically improve both the appearance and function of your nose without creating an artificial look. Whether the changes are dramatic or subtle, the goal remains the same: to create balance and harmony while preserving your natural beauty.
The Consultation Process
Your consultation sets the foundation for a successful rhinoplasty and our dedicated team of medical professionals does everything they can to ensure your process is as comfortable and smooth as possible. Here’s what you can expect during your first visit:
- Step 1: Initial Discussion — We begin by having an open conversation about your goals. During this time, you’ll share what features of your nose you’d like to change and your ideal outcome. Many patients find it helpful to bring photos that illustrate their vision, though we’ll emphasize that your results will be uniquely yours, designed to complement your individual features.
- Step 2: Facial Analysis — Dr. Ridenour will perform a detailed examination of your nose and facial features. This comprehensive analysis includes checking your nasal structure both inside and out, evaluating your breathing patterns, assessing your skin quality, and studying how your nose relates to your other facial features. This step is crucial for developing a surgical approach that will create natural-looking results.
- Step 3: Medical History Review — During this step, we’ll discuss your health background, including any previous nose surgeries or injuries, current medications, and overall health status. This information helps ensure your safety and optimal results. We’ll also discuss lifestyle factors that could affect your surgery and recovery. It is imperative that you always disclose your full medical history and preexisting conditions so that we can ensure your safety.
- Step 4: Creating Your Surgical Plan—Based on your goals and our analysis, we’ll develop a customized surgical plan. We’ll explain the specific techniques we’ll use and walk you through the expected changes. Your plan will address both the aesthetic improvements you’re seeking and any functional issues that need attention. Computer-generated “before-and-after” images are sometimes used to aid in the planning process.
- Step 5: Questions and Discussion — Finally, we’ll have a thorough discussion about the surgery process, recovery timeline, and any concerns you might have. We’ll cover pre-operative instructions, what to expect during recovery, and how to prepare for your surgery day. This is your time to ask questions and ensure you feel completely comfortable with your decision. We will give you all the time you need to feel comfortable and confident about your decision-making process.
Remember, this consultation is your opportunity to learn everything you need to know about your rhinoplasty journey. We want you to leave feeling well-informed about your next steps.
A Practical Guide to Preparing for Your Rhinoplasty
The weeks leading up to your rhinoplasty are crucial for ensuring a smooth surgery and optimal recovery. While the idea of surgery might feel overwhelming, having a clear preparation plan can help you feel more confident and in control. Here’s everything you need to know about getting ready for your big day.
- Two Weeks Before Your Rhinoplasty. This is when your preparation really begins. You’ll need to make some temporary lifestyle adjustments to ensure the safest possible surgery. Stop taking aspirin, ibuprofen, and any blood-thinning supplements. If you’re a smoker, this is also when you’ll need to pause – smoking can significantly impact your healing process and final results.
- One Week Before Your Rhinoplasty. Start gathering supplies for your recovery period. Think of it as preparing for a quiet staycation. You’ll want to:
- Set up a comfortable recovery area at home
- Fill your prescriptions in advance
- Stock up on soft, easy-to-prepare foods
- Arrange for someone to drive you home after surgery
- Plan for help during the first 24-48 hours
- The Day Before Your Rhinoplasty. You’re almost there! Your main focus now is on final preparations. Follow your surgeon’s instructions about when to stop eating and drinking before surgery. Wash your hair, as it might be a few days before you can do so again. Get your recovery area ready with everything you’ll need within easy reach.
- The Morning of Your Rhinoplasty. Keep things simple this morning. Wear comfortable, loose-fitting clothes that button or zip up the front – nothing that needs to be pulled over your head. Skip the jewelry, makeup, and contact lenses. Most importantly, arrive at your scheduled time feeling rested and relaxed.
Remember, the better prepared you are before surgery, the smoother your recovery will be. If you have any questions during your preparation period, don’t hesitate to reach out to your surgical team. They’re there to help ensure you have the best possible experience.
What to Expect from a Rhinoplasty Procedure
Ever wondered what actually happens during a rhinoplasty? While you’ll be comfortably asleep during the procedure, understanding each step can help ease any pre-surgery jitters. Here’s a behind-the-scenes look at your rhinoplasty journey, from the moment you arrive until you wake up in recovery.
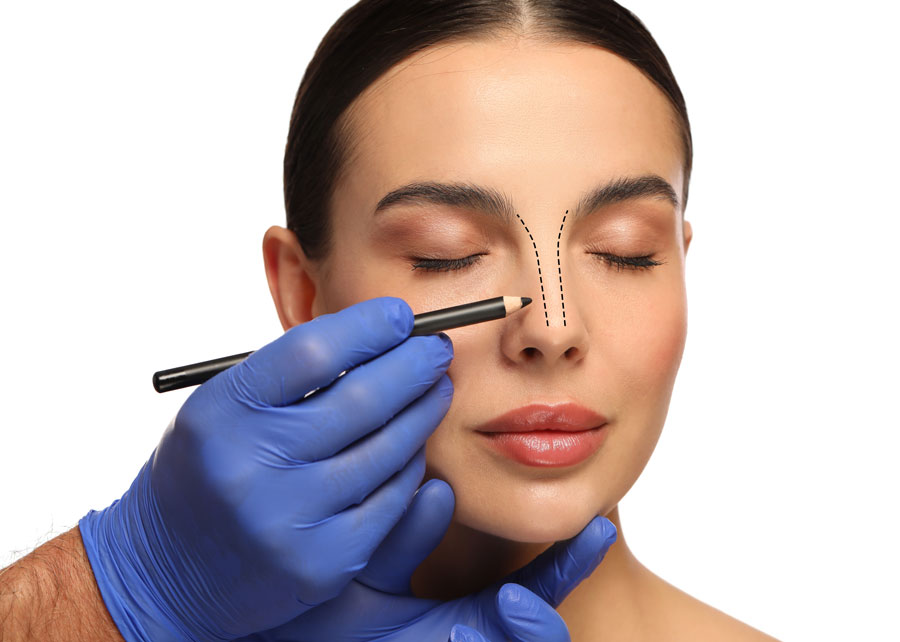
Step 1: Arrival and Pre-Op
Your surgery day begins in the pre-operative area. You’ll change into a surgical gown, and your surgical team will check your vitals and review your medical information one final time. Your surgeon will make surgical markings on your nose – think of it as drawing the roadmap for your procedure. This is also when you’ll meet your anesthetist or anesthesiologist, who will explain the anesthesia process and answer any last-minute questions.
Step 2: Anesthesia
Next, you’ll be taken to the operating room, where your anesthesia professional will begin administering anesthesia. Within seconds, you’ll drift off to sleep, completely unaware of the procedure. Your vital signs will be continuously monitored throughout the surgery to ensure your safety and comfort.
Step 3: Understanding Your Surgical Approach
Before your surgery, your surgeon will have determined whether an open or closed rhinoplasty approach is best for achieving your goals. Let’s explore the difference:
In a closed rhinoplasty, all incisions are made inside your nose. This technique is often preferred for simpler changes, particularly when work is focused on the bridge of the nose. The advantages include:
- No visible external scarring
- Potentially less swelling during recovery
- Slightly shorter surgery time However, this approach provides less direct visibility of nasal structures, so it’s not always the best choice for complex cases.
An open rhinoplasty involves a tiny additional incision made across the columella – that small strip of tissue between your nostrils. This creates a “trapdoor” effect, allowing your surgeon to raise the skin to fully see the nasal structure. This approach is often chosen when:
- Significant tip work is needed
- Complex structural changes are required
- Maximum precision is essential While this technique does leave a small scar, it typically heals so well that it’s virtually invisible within months.
Step 4: The Surgery
Once your surgeon begins, the procedure typically takes between two to four hours, depending on the complexity of your case. During this time, your surgeon will:
- Make the chosen incisions (either open or closed approach)
- Gently lift the skin to access the underlying bone and cartilage
- Carefully reshape these structures according to your surgical plan
- Refine the nasal tip if needed
- Make any necessary internal improvements for better breathing
- Redrape the skin and close the incisions with ultra-fine sutures
Step 5: Immediate Post-Op
After your surgery is complete, you’ll be moved to the recovery area. As you wake up, specialized recovery nurses will monitor you closely. You’ll have a small cast on your nose and perhaps some light internal packing. While you might feel groggy, most patients are surprised by how manageable the pain they experience is.
Recovery and Results: What to Expect After Your Rhinoplasty
The journey with your new nose begins the moment your surgery ends. Understanding what to expect during each phase of healing can help you stay patient and positive as your results gradually emerge.
The First Week: Right after surgery, you’ll have a cast on your nose and possibly some internal splints. Most patients are surprised to find that pain is minimal and easily managed with prescribed medication. You’ll likely experience some congestion, stuffiness, and mild discomfort – all completely normal parts of the healing process. During this time, keeping your head elevated and using cold compresses will help manage swelling and increase your comfort.
You’ll need to be extra careful this first week. Keep your cast dry, avoid blowing your nose, and take all medications exactly as prescribed. Rest is essential, and you’ll find sleeping with your head elevated helps reduce swelling and protect your nose.
Week Two: Cast Removal. Around day 7, you’ll reach an exciting milestone – cast removal! While most bruising will have faded by this point, your nose will still be swollen. This is when you’ll get your first glimpse of your new profile, though remember it’s not your final result. Breathing will start improving, and you can begin returning to light daily activities.
Weeks 3-4: (Mostly) Back to Normal. By now, you’ll be feeling much more like yourself. The obvious swelling will have decreased significantly, and you can resume most daily activities. If you have any remaining bruising, it can easily be covered with makeup. Your breathing continues to improve during this time, and many patients feel comfortable returning to social situations.
Months 2-3: Continued Improvement. This is when you’ll really start to see the changes taking shape. Exercise can gradually resume, and your nasal tissues will continue to soften and settle. Most of the swelling resolves during this period, and your nose starts looking more refined. With your surgeon’s approval, you can typically start wearing glasses again.
The Long-Term Picture: Full healing takes patience. Over the next year, subtle swelling will continue to resolve, your tip will become more defined, and the sensation will return to normal. Your final result emerges gradually as scar tissue softens and your nose settles into its new shape.
Making Your Rhinoplasty Decision
Through careful planning, modern surgical techniques, and proper recovery care, you can achieve the refined nasal profile you’ve always wanted while maintaining your unique facial features and personality.
Remember that the key to a successful rhinoplasty lies in the journey — from your initial consultation through your final results. Taking the time to understand the process, choosing the right surgical approach, and following proper recovery guidelines will help ensure you achieve the best possible outcome.
Ready to begin your rhinoplasty journey? Call our St. Louis plastic surgery practice at 314-501-7437 or schedule your consultation online today. We look forward to helping you achieve the natural, balanced results you desire.